Showing posts with label Holiday Fun. Show all posts

Saturday, April 23, 2011

Easter Happenings

It took me a long time to "get into" Easter this year. I don't know why, maybe because both of my girls decided they didn't want to hunt eggs this year, or maybe because lately I've either been working or volunteering at school and our weekends have been busy....not much free time = not much time for holiday crafting and decorating around the house.  We all know the drill, but I did manage to sneek some time in for a few things: 
This is the "one and only" Easter card I made for a special friend. I had the idea floating around in my head for a while and one night when I couldn't sleep I got up and quietly put this together in my craft room while everyone slept.  I made an egg-shaped template and die cut a bunch of scalloped strips using my Big Shot. I layered and adhered the strips on the egg template until it was covered and then simply flipped it over to the back and cut along the outside. Other cardstock includes Stampin' Up's Very Vanilla and patterned paper from a scrap stash that I bought at a garage sale for $1.00. The sentiment stamp is from Kitchen Sink stamps (another garage sale purchase).

Next is a little treat that I found on the internet somewhere....it was something so different I had to make a few of them to pass out:
It is called "Bunny Hop Pop" and when I saw it, it was one of those times when I thought, "How did they think of that?" It just goes to show that there are so many talented and creative people in this big old world of ours. Anyways, it is made using an orange soda and simply covering the outside with decorative paper, adding a green top to the lid using hot glue and finishing it off with a ribbon and tag. I will definitely be making more of those for next year.

I also made 20 more of these little critters for my 3rd grade class:
Although we kept it gender generic by not adding the beauty mark and bow they turned out super cute! I was so excited to get them boxed up and delivered I forgot to snap a finishing picture.

I think I may check out some submission calls and get myself geared up for a few days off and maybe some creative time squeezed into my busy schedule. I also have a Mother's Day craft that I want to share as soon as I get some cute pictures. Another idea I'm borrowing and it's a cute one too!

Wednesday, April 6, 2011

Where do I begin? A bunch o' stuff...

You know, once in a while I get a little down...I start thinking about this blog and I wonder, "Does anyone really care if I post or not?" I think we all have "visions" when we start a blog, and sometimes the visions become a reality and sometimes they do not. I don't know where I'm going with all of this, I usually don't get this "philosphical" on my blog, and I don't mean to sound like a downer....just letting you know what my thoughts have been. Anyways, I understand and totally get that to become a famous blogger it requires a lot of time, a lot of skill (great photos are a huge bonus) and a lot of dedication. Some days I have it and some days I don't. Some days I want to focus on the fun stuff and some days I want to focus on the required stuff....chores, paying bills, grocery shopping, homework -- you get it. So, that is basically my "excuse" for where I have been and what I've been up to. But, in a positive light, a few weeks ago I got the sweetest e-mail from someone I admire and have admired for a long time....I've never met her, but I think she's super talented, super sweet and I deeply appreciate the fact that she reached out to me during a time when I was thinking, "does it matter?" If you've never been to Laura Craigie's blog, you MUST check it out....she's been on a roll lately and has many accomplishments attached to her sweet name. I would love to be half as talented...

Here's some of what I've been busy with lately:
This is a card I made for a friend using some scraps, SU cardstock, the Teeny Tags stamp set, scallop border punch, Fiskars edge punch, the Outlines alphabet stamp set from Papertrey Ink and a Martha Stewart butterfly punch. Can you tell that punches are my favorite tools to use?

Next up a little card I made for my sister:
This was a quick card I made using a Hero Arts bicycle stamp. (My sister gave my daughter a bike and I wanted to send a thank-you card.) The patterned paper was from my stash, but I think it's from Hobby Lobby's brand. I also used the Apron Lace border punch and the Teeny Tags stamp set.

I've also been working on a few Easter treat samples. I'm not sure what I'm going to go with yet so I just make one or two of something and then I decide.
This is a fun egg-shaped tote that is just small enough to make with one piece of 8x11 paper but big enough to fill with some fun treats. (I actually made these last year.)
This was an easy craft using a piece of cardstock and a piece of vinyl. I punched the holes using my Crop-a-Dile and then cinched it together using purple organza ribbon. I also made another version using clear vinyl on both sides and stitched it together using pink thread and my sewing machine. (Sorry the photo isn't the best quality.)
I think both of these would work much better using flat M&M's (the plain version) but for Easter, the plain version is made in an egg shape. Who would have thunk such a thing? (is thunk a word???)

And, one of my favorite Easter treats is a non-sweet treat....I shared these last year but thought I would re-post a picture:
Easter "carrots" made using Cheetos (or you could use Goldfish crackers) and piping bags from Wilton. These were a huge hit in my 2nd grade class.

And, just in case you're interested, here are a few things I've done in the last few days (things that I've actually managed to take pictures of):
I've long admired a turquoise and red necklace worn by another blogger (that I visit daily) and I've never been able to find one like it....so, yesterday I gathered the supplies and made one all by myself!! I was shocked that it took less than 15 minutes and turned out just the right length and exactly how I envisioned it.  Yahoo!!

Next up, I thought I would share a fabulous bread that we've been making lately. I got the recipe from another blog (what we would do without blogs?) and it's fantastic! In my quest to get my family on a healthier eating path this Oatmeal Bread will be making an appearance quite often at my dinner table.
That's it for now...I promise to be a better blogger, but thanks in advance for your patience and understanding! Bloggers and blog readers are the best!!

Sunday, January 23, 2011

So stinkin' cute!!

I found this fantastic download last week and nearly jumped out of my chair!!! I was looking for something fun for my 3rd grader to share with her class for Valentine's Day and this was IT!!
Aren't these iphone candy covers just the cutest thing??? After I got permission from my 3rd grader to proceed, I ran and hopped in the car to Target to buy the Brach's candy boxes. I chose the tart & tangy variety.

Here they are all covered and wrapped in their cozy covers:
A big shout out to Amy Locurto for her amazing talent and most of all, for sharing this fun download with all of her blog viewers!!

Monday, January 10, 2011

Working on a few things...

Spending some time this morning working on a few upcoming projects for the next holiday...always thinking ahead although one of my goals for this year is to "live" in the moment....here's what I put together for my 5th grader to take to school:
Have you seen the sour cream containers you can make with a piece of paper cut to 4.25 x 5.5 inches? I'm not ready to fill mine, but here's a great tutorial. They make the cutest little packages to hide yummy treats.

Also gathering a few of these for an upcoming project:
Actually, we have a few girls getting together for a fun afternoon of crafting Valentine Sundae Cup Centerpieces.  I need to get busy finding all the pretty candy to fill the glasses for my sweeties. This is going to be fun! And, I'm having the best time hunting through my local thrift stores to find the glasses for everyone.  There's nothing like a good hunt!   

Take care and stay safe!

Tuesday, October 26, 2010

Finishing Up & Learning Something New

Well, I thought I was just about finished with all of my Halloween goodies including these little kraft bags:
I made a few extras today using the fab & wonderful K&Company die cuts I bought from Michael's a while back.

And then I thought I would re-purpose a Starbucks bottle given to me by decorating it with some cute paper and adding a few chocolate goodies.  (I don't have a clue where the original candy went...) This will brighten someone's school cubby tomorrow.
And then I found this fun tutorial yesterday and had to give these little triangle boxes a try:
They are so nifty and so easy to make!! Where have these been all my life? Have I been living in a cave? Well, I don't know, but I will definitely be hanging on to this pattern for future's sake. And, as I was tying the last few I made this morning I thought how cool they would be to use for an advent calendar and instead of punching the "Happy Halloween" sentiment each box could be labeled with a number.  Thanks so much Angie for this awesome tutorial!!

The patterned paper and stamped image I used on these boxes are from Papertrey Ink, along with Stampin Up's Pumpkin Pie cardstock and my 1 3/4" circle punch.

I can't wait to pass these out and make more!

Sunday, October 24, 2010

A Peek & Share

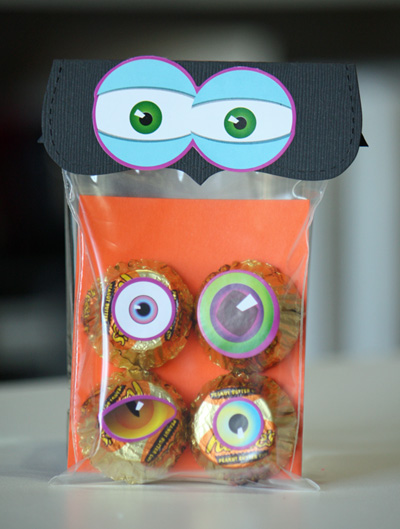
Here's a peek and share of what my girls will be giving away in their classrooms for Halloween treats this year. I decided to go simple and give both girls the same thing to share with their classmates.
Still don't know what they are? How about if I show you this picture?
Hmmm, now we are getting closer.....but here's a full shot for you to check out.  I told you I would share. :)
And another version:
I kept things very simple....just a little bit of cardstock, stickers, and a simple stamp that says, "Open if you dare!"  I think the kids will like them.

I also want to share the original source for the idea....I found them at an amazing blog called "it is what it is" - and let me just tell you, her stuff is so stinkin' cute! I only wish I had that kind of talent when it comes to graphic design....oh the possibilities. Her bags are cuter and stuffed with much more candy, but I have 40 kids to treat, so I thought 4 peanut butter cups were plenty + let's not consider the other goodies and candy they will receive.  Here are the bags she put together which inlcude a free printable tag. I think she applied the stickers to the tops of her Reese cups, although I found the bottoms (the smaller end) much easier to use. And, I wanted to use her printable tag, but because my bags were smaller, I opted for this version.

This was an easy, mess-free craft profect that we worked on together. Try it out!

Thursday, October 7, 2010

Boo Bags

I enjoyed giving out these "Boo Bags" today to a few special people in my life.  My kind of easy, non-stamping, fast, whip together kind of treat.
Not much as far as edibles in these spooky treat bags, but instead some fun Bath & Body Works "Candy Corn" hand sanitizer along with a fun matching gelly holder [sorry, forgot to take a picture of the contents].  I was trying to be considerate to those watching their waistlines...but I did manage to sneak in a few pieces of Halloween chocolate.  Maybe they won't notice...

I found these fun die cut images at Michael's.  They are from the K&Company "Spooktacular" line.  The background patterned paper is from Papertrey Ink (last year's designs).

Take care!

Monday, September 27, 2010

A Few of My Favorite Scenes

I know everyone has been on the bandwagon lately with the "I Love Fall" theme, so I thought I would jump on in....because, you know what? I love the fall!!!

We are at home tonight, it's raining, my girls are in their jammies, I'm not far behind....and we have a fresh pot of potato sausage soup cooking, homemade french bread ready to be gobbled up:
and pretty candy corn lights shimmering outside my kitchen window:
and inside I've pulled out some of my favorite fall decorations including these lovelies:
No, they aren't real, but in Florida, we don't get a huge change of colors....in fact, my air conditioner is running right now at 77 degrees...oh well....it will cool down soon enough.  And when it does, I will be sure to make another batch of these yummy treats:
Roast Beef and Argula paninis we cooked up the other night for dinner.  A tasty recipe from one of my favorite cooking shows, Five Ingredient Fix.  I love this show!

Take care....sorry for all the randomness, that is how my mind has been operating lately.

Saturday, May 8, 2010

Because I know my Mom...

doesn't read my blog, I thought I would share with you the arrangement I put together as part of her Mother's Day present: 
My Mom is so low-key and she said she didn't want any gifts this year, but I couldn't make myself not find something "pretty" for her [is that a double negative???].  I went to Michael's and glanced through their floral arrangement displays....nothing really grabbed me or fit the design I had in mind, so I did what I always do....I made my own.

These are not my normal "go-to" colors, but I love hydrangeas of any kind (real or artificial) and these three groups of flowers all seemed to just fall into my hands.  One bunch, (the small white flowers) I found in the dollar bin and they really helped add the finishing touch.  The total for this bunch of flowers + the ceramic pitcher was less than $15. 

I'm busy in the bow-making department now, because I wanted it to look a little bit more like a "gift" vs. a regular arrangment and then I'll add some cellophane and a card.  I can't wait to give it to her tomorrow.

Happy Mother's Day! 

Sunday, April 4, 2010

Scenes of the Day

Hello and Happy Easter! We are celebrating as a family today...no big plans, except being together and taking it easy for a little while...not to mention we are also enjoying our Spring Break holiday this week.

We made some really delicious Easter cookies using a simple recipe from Southern Living. It's a 5-ingredient recipe that makes a delicious shortbread/sugar dough.  I've always loved rolled out cookies and imagine all kinds of possibilities when it comes to decorating with piped frosting, sprinkles and such.  Sometimes the process can be a little intimidating, but with a little patience it can be a really fun experience.  We plan on making more with this easy dough.
Next up is a picture from this morning:
The girls had a fun morning tearing into their Easter baskets. These baskets are a little on the small side, but they still seem to hold lots of goodies.  Their loot included a little bit of candy along with a cute t-shirt, Littlest Pet Shop toys, a paintable craft, fun erasers and a golden egg which included a little bit of spending money.

Friday, April 2, 2010

Millinery Cards & Cute Felt Bags

I recently found these Easter cards in my "Correspondence" box.  I made these several years ago. The basic card is so simple, just a folded piece of purplish paper.  No embossing, no rounded corners, no stamping. The envelope was made using a tiny template of some kind.  And, I'm almost sure, the teeny tiny tag was made on the computer and then hand cut. 
I think the fanciest thing about the card is the little brad I attached to the tag.  I guess that was a big technique back in the day.  I thought the carrots were a sweet addition, but a little hard to mail in a flat envelope.  I picked them up at the craft store in the millinery section.
These are two little gift bags I put together with some Easter treats, including the bunny notepad, some chocolate and a little pillow box filled with jellybeans.  These bags are from Michael's.  At $1.00/each they were just too cute to pass up and much cheaper when you count supplies + time on my budget than homemade.  Sometimes homemade doesn't win. 

Thursday, April 1, 2010

Bunny Notepad

I found these sweet notepads at Target's Dollar Spot.  As soon as I saw them I thought of Papertrey's famous skinny notepads with covers. 
After I grabbed a little cardstock, some paper scraps and a little bit of ribbon and sticky tape here's what I came up with:

The felt chick is an embellishment from Michael's.  When I'm in a time crunch I always fall back on embellishments vs. stamping or coming up with a paper-piecing, etc.....they save so much time and always look cute.  I also used my Martha Stewart fringe scissors and my reliable baker's twine.  The patterned paper is an old design from American Crafts.  You can't go wrong with pastel polka dots at Easter.

These will be a special tuck-in for some Easter bags I am giving away.

Wednesday, March 31, 2010

Non-Sweet Easter Treat

I spent a little bit of time this afternoon putting together these Easter treats for our 2nd grade class:
I've seen several sites with the same idea, using piping bags made by Wilton, along with a carrot "stuffing" of Cheetos, Goldfish crackers or jellybeans.  I decided to go with a non-sweet version and simple carrot top using grosgrain ribbon and green ric rac (leftover from World Market's Christmas clearance).

Saturday, February 13, 2010

Paper Roses Don't Taste this Good

I signed up in December for a cake decorating class at my local library. The original date [in January] had to be rescheduled to this past Wednesday. One of the local decorators at our Publix grocery store volunteered her time and Publix graciously donated lots of supplies for this free class.

I've dabbled in icing techniques here and there for the annual birthday cakes we produce, but nothing ever really fancy, so I was up for a challenge.

This is what we saw when we entered the meeting room:
After we piped on some icing swags and a top and bottom border, we were ready to tackle the prettiest of all....roses:
Now, don't be fooled.....that giant beauty in the back was the decorator's example...see how perfect it is! My first attempt is the rose in the front with the slightly wavy petals. More like an artificial rose if you asked me. And, the icing was beginning to get warm, so I tried to work quickly.

Next up, I moved to a red icing to try my hand at more roses, and then we learned a technique for rose buds, which you can see are a reddish-whitish because the decorator added fresh icing and didn't mix it in completely. I decided to make mine look as if they were "falling" over the edge.
I also made leaves (my first time) which I thought resembled ivy and came up with a small sentiment with a simple tip. I was thinking at the time that "Valentines" was too long to pipe. I guess it was a pretty good idea because the lady behind me asked if she could use the same wording on her cake.

Here's the final result: And here's me in all my glory with Loretta, the decorator. [I needed this picture for my 40th scrapbook album.] I had a fun time and it sure is good to eat!
Hugs & kisses to you....Happy Valentine's Day!