Wednesday, December 30, 2009

A Christmas Thank You & New Stuff

I wanted to make some personal thank you cards for some very special gifts we received this Christmas season. So, I sat down this morning, in my pjs, and "played" until noon! Don't you just love it when there's no schedule???

I blended several of my favorite stamp sets, along with some of my favorite supplies and colors and came up with this:
Here's the full view:
I went to my kraft paper stash and cut them down to an A2 sized card (4.25 x 5.5"), next I grabbed my SU Very Vanilla paper, a sheet of red Bitty Dots paper from Papertrey Ink and a smidgen of Old Olive SU paper for the tag. I also used my Fiskars Apron Lace border punch and my tag die from Spellbinders. The stamp sets I grabbed were "Signature Christmas" and "Turning a New Leaf" from PTI and one of my absolute favorites, "Berry Christmas" from Stampin' Up. The ink colors I used included, Old Olive and Real Red (SU), along with Vintage Cream (PTI). I also raised the tag up a bit using some dimensionals.

I needed to keep it simple and not so bulky because I had several to make.

Next, I wanted to share something I bought a week or so ago and it has made a WORLD of difference in my stamping....have you seen these foamy pads (or craft mats as they are called) that are made specifically for rubber stamping? It reminds me of my Bazzill stitching pad, but the size is great for card making or even scrapbooking.

I didn't take a picture of the packaging, but mine is made by the Darice company and was a steal for only $5.99 at my local scrapbook store.
I tried to get a source for you to check one out on your own, but so far, no luck. Be on the lookout next time you visit your craft store and ask to try one out. My local store had these on their make-n-take table. See you later!

Tuesday, December 29, 2009

Got to See it....Finally!

Nothing crafty about this post....but I just had to share....I finally got to see Sandra Bullock's "The Blind Side" movie. I've wanted to see it ever since I saw the previews on TV and as soon as it came out (over Thanksgiving I believe) I was sure everyone in my family (especially my hubby) would be as anxious as I was to stand in line to check it out. Well, unfortunately, it didn't work out that way....no one wanted to see it, not even my hubby.

So, this past Saturday, I d-r-u-g my 7-year old and my sister to see it. And, believe it or not, the theatre was packed!!!
And, better than that.....it was soooo good! It was a really awesome feel-good movie and it was funny too, and let's not even mention the really handsome country music star in all his glory ready to gaze at on the big screen. I was so inspired by the story I thought about it for the next two days. I'm ready to see it again and invite all my friends!

Monday, December 28, 2009

Decorate Your Dog

If you want to see a really easy way to "dress up" your dog....check these out! I made several of these in minutes....I call them "Dog Collar Sleeves" and I found the pattern here.

I went through some of my holiday fabric and made several to keep handy for the future.

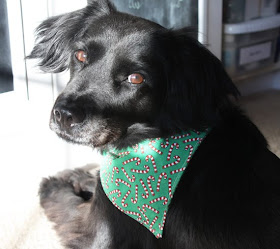
Here's my dog, "Baby" dressed up for the Christmas holiday:
I made a few more, one for Valentine's, Halloween and one which can be for everyday, pretty in pink:
I prefer these over the traditional "scarf" which we get when we go to the vet's office, because they always become frayed, and look a little messy after a few days. These sleeves have an opening, which slips over your dog's collar.
Here's a shot showing you the opening: (and aren't my hands starting to look W-A-Y old??)
If you don't sew, let me know and maybe I can make one for you, my treat....Happy New Year's!

Friday, December 25, 2009

An Oldie & A Goodie

I decided to put together another Christmas treat yesterday considering I had all but two of the ingredients on hand. These are my Mama's Russell Stover candies, although I've heard them called two different names since yesterday.

Here they are in the beginning of the assembling process:
They are made using a combination of coconut, pecans, sweetened condensed milk, powdered sugar and shortening. Once you combine all of those ingredients you let your bowl chill for two hours before rolling your candy mixture into small balls.

Next, melt chocolate chips and paraffin wax over a double boiler:
Dip each ball into the chocolate quickly and set on wax paper to set up. They are pretty easy and make a ton to giveaway.

Here's a small sampling sitting all pretty on my dining room table:
Merry Christmas!

Sunday, December 20, 2009

This & That: Skinny Notepad

I bought Papertrey's famous Take Note stamp set and finally had the chance to put together my first "skinny notepad." I think this concept is so genius and when I saw it it was one of those times when I said, "Why didn't I think of that?" Anyways, we can all benefit from Papertrey's ideas and put together one of these:

Using a template provided from Papertrey, I grabbed a piece of BoBunny patterned paper (from last year), my scallop edge punch from Stampin' Up and another Spellbinder scallop circle die.

Here's what the inside looks like using PTI's white skinny notepads:


The possibilities for these pads are endless and I can't wait to make a few more.

Saturday, December 19, 2009

Gift Card Tuck-Ins

Less than a week to go now until the BIG day....are you ready? I had one more small package to mail out yesterday, and it included two gift cards. So, I spent a few minutes putting these together. Here's the first one:
I went on-line and found this simple template [and I don't have the link....sorry] and got to work with some paper scraps and stickers.
The template measures 4 1/4" x 8 15/16". You score at 3" and 6" and then cut a small portion from the inside flap to hold your gift card [you can see this below]. This pattern is so easy and only takes minutes to put together.

Here's another one:
The supplies I used included my Sizzix mini-tag die and my Spellbinders Scallop Rectangle Nestie dies. I also did some faux stitching with my Signo white gel pen. The Christmas stickers are from a Doodlebug sheet bought a while back.

Here's a shot of the inside showing you how the gift card tucks-in. It needs some embellishment, but I was hurrying for a picture while the sun was [sort of] out. The days have been so gloomy lately.

Just thought I would share!

Thursday, December 17, 2009

Holiday Classroom Treats

I've been working this afternoon on classroom treats for my 2nd and 4th grades. Here's what I decided to do....there are so many cute things out there, it was actually hard to narrow the choices down to two things:
Rudolph's Nose Repair Kit
I used a mini cello bag and filled it with ten sour cherry round-shaped candies I found at Hobby Lobby. I then topped it using some patterned Christmas paper cut with the Top Note Stampin' Up die. I also used my Cricut Doodlecharms cartridge to cut a 2 1/2 inch reindeer for the front.

On the reverse side I attached the "Repair Kit" poem which tells the children what to do with their spare noses. I thought this idea was really cute and may be something new they hadn't seen before.
Next up, for my 4th grade class, I used plain white computer CD envys stamped with a polka dot design in red and green, to hold individually wrapped krispie treats. To stamp the polka dots I used PTI's Polka Dot Basics and Stampin' Up ink in Real Red and Green Galore.
To save on time, I decided to top each envelope using an assortment of tags I found at Michael's. They were attached to the front using a glue dot. Easy, easy.

Here's the boxful before the tags were attached to the front. This class is large, 21 + the teacher.
My girls love having something to pass out and I have fun putting these sweet treats together! I'm off to "work" on something else. Have a good day!

Monday, December 14, 2009

Tree of Scraps

Busy bees in this house these days....I'm working in kindergarten this week, crafting in second grade, and serving breakfast to two classes on Friday. Tonight we decorated Christmas cookies, using Martha Stewart's sugar cookie recipe and royal icing colors in red, blue and green. They turned out really cute and yummy too.

Also, tonight I made a sample of the homespun tree craft I will be taking to my second grade class this week. I had all of these pieces (minus the wooden stars) in my craft room, so they came together in a cinch. I think I got the original idea from a Gooseberry Patch Christmas book.

All you need are cinnamon sticks (cut to 5-6 inches in length) or you could use twigs. Strips of fabric cut to 1/2 inch x 6-7 inches, a star decoration for the top and twine for the ornament hanger. Tie the fabric in knots up the tree, we used 7 strips of fabric. Then, using your scissors, cut the strips into graduated pieces resembling the triangle shape of the Christmas tree. Attach your topper decoration and twine with hot glue.
It's as simple as that. We also sprinkled a tiny bit of gold on the wooden star for a little bit of glitz. Be as decorative as you want. I tried to keep things simple and neat.

Be back with more later!!!

Friday, December 11, 2009

Feltie Fun

I love working with felt. There is never any problem with exposed seams, frayed edges or anything....felt is fun!!! Here are a few projects I have done in the past working with the felt in my craft stash.
A fabric art journal covered with a cute felt cupcake
and the birthday girl's name:
A felt gift tag dresses up a simple package covered with kraft paper:
Treat bags to celebrate the Easter holiday:
An adorable tooth fairy pillow that includes a heart pouch (on the back)
to hold your child's tooth and the tooth fairy's treats:
And today, I made a Poloroid feltie for my sister's favorite person,
her grandson, Dalton:
I found the tutorial for the feltie on this post and made two of these using one 9x12 piece of white felt. This is an easy project that comes together in less than 10 minutes. Of course, make sure your recipient knows what a Poloroid is....I had to explain the concept to my two girls.
I also decorated my feltie using an evergreen tree from Hero Arts and a Christmas stick pin from the Making Memories Mistletoe line.

Wednesday, December 9, 2009

Shopping from the List

I've been in the market for quite some time for a new sewing machine. I decided I wanted to invest in a machine that would last, hopefully, for quite a number of years. Since my interest in sewing has increased (how could it not with all those great projects out there!!) I wanted to get past the cheapy $89 deals from the big box stores.

A few days ago I went looking on my local Craig's List and found an ad for this machine: a Janome DC3018.

Well, yesterday I met a really nice lady named Carole who bought this beauty 2 years ago and had only used it once. She didn't even know how to thread it properly. She was so sweet. She explained to me the fact that she had two artificial wrists and could no longer push herself to do needlecrafts or even think about sewing. After I "played" with it in her kitchen for a short bit of time I decided to purchase it for myself.

Isn't "she" pretty?? I can't wait to experiment with some ideas in my sewing journal. Thanks Carole for the great deal!!

Monday, November 30, 2009

A Holiday Order

I filled a holiday order today for three of my wristlet purses. I was hesitant to approach my sewing machine, but all is well [we parted ways a month or so ago] and these are packaged and ready.

The "customer" wanted specific colors, but no specific patterns, so I just went with what I had on hand. Next up, I thought I would package them so she wouldn't have to worry about the gift wrapping duty on her end.

I bagged each wristlet purse in a cello bag with some silver shred and holiday ribbon. To finish each one, I used my Tree Trimming Trio stamp set from PTI to make tags. I kept things simple and added some stitching as the last detail. I can't say I've ever stamped a blue Christmas tree before, but I thought they looked cute enough.
Here are the trio of wristlets... first, red + white:
second, blue + black:
and third, black + white:
I hope she likes them. :)

Friday, November 27, 2009

Organizer Tuck-Ins

Here's a peek at a few of the cards I included in my stationery organizer. They were are made using papers and embellishments from the same Mistletoe collection by Making Memories. I tried to keep them fairly simple so that when they are mailed they won't require additional postage (hopefully).

I also excluded a greeting, so that they could be used for Christmas letters, notes or thank yous.

A few extra supplies include some Martha Stewart baker's twine, Papertrey's fabulous rustic twine, Spellbinders dies, Stampin' Up's scallop edge punch and my one and only snowflake punch.

Thursday, November 26, 2009

One of Many

One of the many ideas floating around in my head right now is this fabric stationery organzier. So, today while we had some "free" family time, I put together this design based on my own concept, which, as you will see, is a very simple one.

A little while back, I bought a package of blank, pre-folded Christmas cards made by Making Memories, along with some patterned paper and a few embellishments from the same "Mistletoe" line. My idea was to give a set of pre-designed cards (with envelopes) in this stationery organizer so that the recipient could use them for Christmas notes, letters or thank yous.

Here's a close up the tag design for the front cover. It is removable, being hung by a tiny gold safety pin. I tried to use as much from my own stash as possible. The patterned paper is from Making Memories and the felt tree is from Hero Arts. I added the "candy-striped" beads using red thread and a sewing needle. The stamped sentiment was made using Stampin' Up ink and the Signature Greetings stamp set from PTI. Their stamps impress wonderfully on muslin. The images remain crisp and clear.

And here's a picture of the inside which shows two pockets designed to hold 4 cards and 4 envelopes, for a total set of 8. I also added a length of twill tape (which I later decided needed to be sewn on the outside) to be used to tie the organizer shut.
Once it is closed and tied in a pretty bow it measures approximately 5" x 7".
Nothing too complicated going on here, and if I had to do it all over again, I would have loved to add a spritz of Glimmer Mist over a snowflake stencil. Maybe I'll give that one a try next time!