This week my girls decided to make a decorative collar for their favorite furry friend, our dog Baby. I put their creation on her this morning and she gave me that "do I have to wear it?" look that all dogs give you whenever we [humans] decide to do something "fun" like that...it was funny but she was so patient and kind enough to put up with us. Anyways, once she was dressed, we had to snap a few shots of her with her new "designer" collar on. It was made using some leftover felt I had in a basket from a t-shirt project I'm working on. I guess she thought good enough of it to cover Abby's face with a big helping of kisses.
Saturday, May 31, 2008
Popsicle Card
I found this card idea the other day and thought it would be the cutest thing for a summer party or a birthday invitation. I needed to make something quick for a gift to give on Monday and I immediately thought this would be perfect. I did not make mine to fit in an envelope, but rather, to sit on top of the wrapped package as a decorated topper. I used my Making Memories slot punch tool to insert the popsicle stick and my scallop punch for the "bite" mark and the embellishment on the front of the card. Wouldn't a big colorful row of these look cute as table decorations at a pool party, or place card holders at the table? Cute, cute, cute!
Friday, May 30, 2008
A Few Changes
Hey! In case you didn't notice, I've made a few changes to the blog. These are some things that I've wanted to do for quite some time, but never really took the time to sit down and figure them out. This summer I had two major goals, one was to add music to my blog and the other is to get into the on-line banking world. Well, as you can hear, hopefully, I've added the music and I'm very excited!! I can't wait to have all 100 songs loaded and listen while I create and dream up the possibilities for future creative possibilities. I also thought it would be neat to watch the traffic on my blog and see where you guys are coming from. Last night, I was able to get a traffic watch installed and it seems to be running perfectly. I hope you stay in touch!
Thursday, May 29, 2008
PFA Pages
As a send-off gift for our school's Vice Principal, the president of our PFA (Hey Sharon!) thought it would be a good idea to create a school scrapbook using pages designed by the entire student body and faculty. These pages will contain messages and best wishes to our exiting Vice Principal. I volunteered to do the pages for our PFA Board. So far, this is what I've come up with. I am still waiting on one message (Hurry up, Sandra!) and then it will be completed. The original idea was to come up with something using a purse template or crown template, but it didn't come through "creatively", instead, the thought of using some hand stitching, the purple (lilac) paper that was given to me and some pretty paper flowers came together with this being the end result. As I sat back and looked at it for the first time, I decided to add some "bling" in the form of little clear crystals to each flower's center...I think it added a nice detail. I hope everyone likes it!
Sunday, May 25, 2008
Mermaid Girl
I completed a scrapbook layout this morning...it's simple, but I think it's still missing something. I began using a swirl-patterned background paper that I felt was too busy to work with in the end....but overall, I am happy with the result. Sometimes it just takes putting something together and then you will think of that *one* thing that is missing that will complete the look you're after. This was one of those "creative play" afternoons. I was busy with something at the craft desk and Abby came hopping in...I quickly grabbed my camera and took these shots. Somehow she got the idea to use her pajama pants to create a mermaid outfit. (She absolutely loves this bikini top which I won't let her wear out of the house.) I also got to use a few new products that have been sitting around for quite some time....my new Bazzill stitching templates, a border tape that I've had forever and the small 8x8 scalloped paper that I bought on sale at Michael's.
Monday, May 19, 2008
Ribbit, Ribbit
Here's another example of "borrowed inspiration." I found a picture of these cute frog bags in a magazine and I immediately thought of my daughter's kindergarten class. The theme for their class is "frogs." I showed the picture to the teacher a couple of weeks ago and she said, "Oh, I have to have those for my end of the year gifts!" So, of course, I offered to find the supplies and make them for her. I had a little trouble finding the green lunch bags. I certainly wasn't going to make my own as the creator of the "sample" did - way too much work. I finally found these bags at Michael's for $2.99/12. I used my Coluzzle circle cutter to make the green circle and the red circle. I used my trusty scallop scissors to create the decorative edge. My daughter's teacher supplied me with the google eyes and they all came together very quickly. I also punched out the tags to which we can put each child's name. I can wait to see their faces!
Sunday, May 18, 2008
Altered Coffee Can
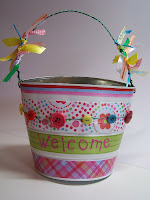
I finished a really neat project this afternoon. I saw this idea on a blog that I visit often. This girl does really amazing work - in fact, I just saw another really cool idea last night in a Papercrafts magazine and, as I was "oooohing" and "aaahing" over the project I looked up and noticed that it was created by her - the same girl I "borrowed" this idea from. Anyways, as soon as I saw this altered can on her blog I knew I had to make one. The vice principal at my daughter's school is leaving in June and I thought this would be a perfect "send off" gift for her to use at her new school. She is such a kind spirit and I will miss her dearly. This can is made using a jumbo coffee can which has been sprayed with white spray paint. After you paint it you bend it and begin covering it with decorative paper using Mod Podge. The handle was made using wire that I had on hand. I think next time I will choose a plain black wire instead of a colored one but I was trying to save myself a trip to HD. The welcome letters were made using my Cricut. I also (using the "borrowed" idea) attached a wired string of buttons with hot glue. This was my most favorite detail of the whole can. The buttons really add that homespun charm. I hope she likes it!
Catching Up
This was the last layout I worked on at the last all-day crop I attended. It's always interesting to see how long it takes me to pull out the layout kits I bring with me to the crops. When I get home, usually the next morning, I unpack all of my bags and put my layout "kits" in a specific drawer in my desk. This was the one on top that I pulled from yesterday. I had a few minutes to work on it and I just finished it up this morning. I added some machine stitching (love it), some new Making Memories trim I bought at AC Moore and a few photo corners. For my journalling I used a white pen on the bottom corner. It's simple and sweet all at the same time.
Wednesday, May 14, 2008
Baby Gift Bag
I had a few minutes tonight after dinner and before bath to put together this really cute bag to hold the baby bibs to be given to the teacher tomorrow. This is another one of those really inexpensive 4/$1.00 bags from Michael's. I used the fabric colors for my inspiration and to coordinate the entire look. I love the small checked paper from Michael's - I try to stock up when they run sales. I use this pattern all the time. I thought it would be appropriate for this baby theme. I couldn't decide on the central focal point. I stamped a baby carriage and tried to watercolor it, but didn't like the results. Watercoloring is definitely not my thing, although not for lack of trying. Anyways, I remembered that some of my Cricket cartridges come with a tag design like this "for you" sentiment, so I decided to go with it. I also used another one of my favorites, the red & white gingham ribbon....love it! I also got to use another new & now favorite tool, the Fiskars threading water punch. It is used on both of the white pieces of cardstock on the top and bottom of the bag. Love it too!
Baby Bib Designs
Well, I am getting more and more comfortable with my sewing machine, so I decided to whip up these little infant bibs as a gift to my daughter's reading teacher. She is due the first of June with her second child, a boy. I found the idea for the bibs in one of my new books, "Bend the Rules Sewing" however, I loaned it out. I remembered what kind of fabric to buy, cotton for one side and cotton flannel for the second side so I picked up some for a really cheap price. While I was home this past Sunday I found a really cute pattern on-line for these particular bibs. I certainly hope the neck area is big enough - I think we forget how really small those little babies can be. Anyways, I decided to make three bibs, including one using the reverse fabric as the front side to which I hand stitched an "I" for the baby's name. I also used velcro for the closure instead of snap buttons which I did not have. Now I need to get moving on a decorated bag to put them in. See you later!
Sunday, May 11, 2008
Happy Ellen Day
My mother-in-law's birthday fell on Mother's Day this year. As we were planning our day - trying to include both Moms (she and I) on this very special day, I asked my husband if anyone was bringing his Mom a cake. He said, "probably not." So, as he was headed to the grocery store to buy us all some goodies for Mother's Day breakfast, I told him to pick up some chocolate chip cookie dough. I have gotten a ton of use out of this Wilton cookie cake pan. It makes the most delicious cookie cakes and it's WAY cheaper than buying one at the bakery. We didn't have much time this morning, but this is a picture of the cake we presented to my mother-in-law for her birthday and to also celebrate Mother's Day. (It was my husband's idea to decorate it with "Happy Ellen Day.") She was surprised and enjoyed the thoughtful gesture. (If we would have had more time I would have used another color of frosting, but "green apple" was the color I chose to use for today.)
Friday, May 9, 2008
Cupcake Bites - First Attempt
On Martha a few weeks back she had a guest who shared a technique for making the CUTEST cupcakes I've ever seen - they were actually called "cupcake bites" because they are miniature versions of the original and decorated with dipped chocolate instead of the standard "frosting." Well, I decided that for this week's kindergarten Mother's Day luncheon I would make some, or at least "attempt" to make some to share with the class and the visiting moms. I think they turned out well for a first attempt. They are actually made using a 9x13 sized cake that is ground up and mixed with a container of cream cheese frosting. Then you form the cake into round balls and press each one through a small cookie cutter giving it a cupcake shape. (That process is very messy!) I need to get a smaller cookie cutter to form the bottom of the cupcake. The one I used is 1.5" wide and the original directions suggest using one that is 1.25" wide. The last step is to dip each side of the cupcake bite into melted chocolate. Because my cake "balls" were bigger I decided not to put the bites on a lollipop stick (as they showed on Martha), but rather just leave them on a serving tray for the party. A tray is also much easier to transport and less mess for the children. I was hoping to have the mother's cupcake bites (I made 12 for the children, and 12 for the moms) wrapped in a pretty bag with a pretty tie but, maybe next time. And, we also HAD to taste one - they are very rich and one is just about all you want to eat. Good thing for me!
Tuesday, May 6, 2008
Potato Chip Treat Bag
O.K. So I couldn't wait until tomorrow to post this picture. I just finished putting together the treat bag to hold the teacher's potato chips - this particular teacher doesn't like "candy" but instead, prefers "chips of any kind" so, we've treated her to a bag of Cape Cod chips, my personal favorite. I'm so glad I keep these white gift bags on hand. I always try to grab a few when they run a sale of 3/$1.00 or 4/$1.00. I've also used these many times for my daughters' birthday party treat bags. For this bag, I just went to a handy stash of coordinating paper I had and put together a couple of punches, along with a "thank you" sticker I picked up during the Shop Hop. I knew they would come in handy for a quick thank you of some kind. I'm pleased with this no-frill design.
Teachers' Treats
This week I finally get a chance to giveaway all of the teacher goodies I've worked on for so long...and with that, I finally get a chance to see my dining room table again. I've missed seeing it - like an old friend. This afternoon, in celebration of Teacher Appreciation Week, I put together two candy goodies for my girls to give their teachers tomorrow. I do have one left to go, for a teacher who doesn't like candy, but chips, and I'll post that picture maybe tomorrow. I'm still working on conceptual "ideas" for that one - I'm thinking a decorated gift bag. These packages contain the mini-sized candy bars instead of just one big candy bar. I hope you like them!
A New Favorite
I have a new favorite tool to add to the collection. I recently bought an Olfa rotary cutter to help out when I'm working with fabric. (I have a hard time using scissors to cut fabric against a pattern.) Saturday night, I started putting together more fabric headbands (they are soooo easy) for my daughter and her friend for a birthday present. My new cutter worked like a dream. I couldn't believe how much easier it was to run alongside the pattern instead of battling the up and down motion of the scissor blades. And, it was so much faster, which is always a bonus in my book! This Olfa brand is a little bit more expensive than the Fiskars brand, but I thought the quality may be a little better, and I had a coupon (at Michael's) so I took the chance. Well worth the $$$.